

I’m building a desert terrain board to feature our World War II desert figures.
I’ve been doing a lot of research for this board. Here’s a rough plan I drew out:
The next question: how big to make it? It had to be big enough to had a skirmish with a couple of squads per side without having the opposing sides right on top of each other. On the other hand, it couldn’t be so big that I couldn’t transport it. After much thought, I came up with 38″ wide by 30″ deep. That size fits perfectly in the back of my Wrangler without having to take the seats down. It’s pretty close to the NUTS! recommended size of 36×36.
Step 1
Finally time to take the plunge and get started. There are several choices for the base. I’ve used 1/8″ and 1/4″ Masonite in the past. 1/8″ works well for small independent terrain pieces but in large scale it can warp. Plywood is less likely to warp but can be heavy. In fact, any material made up of wood chips and glue is going to be dense and heavy. In the end, I looked around the shop and picked a piece of 7/16″ pressboard. It is a bit heavier than I’d like but I don’t think it will warp.
Having cut the board to size, I put the rough side up. It will be completely covered with terrain, so might as well leave the smooth side down for the hands to not get splinters in later.
Following the map above, I laid out the Styrofoam insulation pieces:
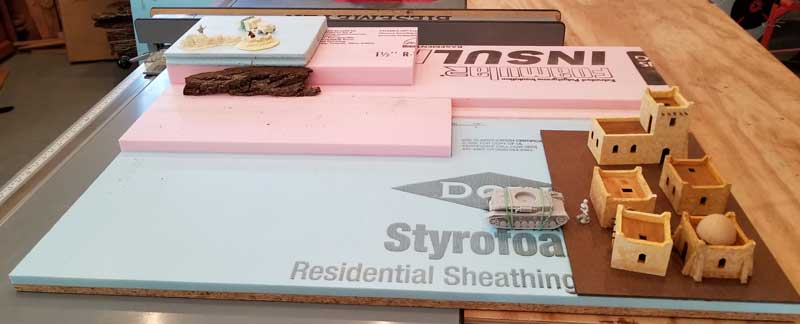
This stage is just blocking in the terrain features. I have 3 types of Styrofoam: 1 1/2″ pink, and 1″ and 1/2″ blue. They’re all pretty dense foam and won’t crumble like the white stuff. I wanted the foam to cover to the edge pf the board on all but the near side, so I made certain to cut all the outside edges square and smooth on my table saw
The dark piece in the upper left is a piece of walnut bark I’ll use for an exposed cliff face. The brown piece in the lower right is a piece of 1/8″ Masonite for the built-up area (BUA on my map). Some houses are on it for scale. Later I’ll make some houses specifically for this board. The plan is to have the BUA as a separate piece that can be replaced: fortifications, perhaps, or a supply dump or the corner of an airfield. The hull of a Wirbelwind gives a sense of how wide the road should be and the figures on the hilltop are for scale as well.
Step 2

All the layers are glued down. I used Liquid Nails, a construction adhesive designed for the purpose. Since Liquid Nails is not water-based, there was no danger of warping. I put some weight on it overnight anyway. I had read somewhere that using screws to hold the pieces in place helps. It didn’t. putting the screws in twisted the pieces out of place ever so slightly.
You’ll notice that I added another layer of blue foam to the right rear and made a wadi running through the hills.
Also in this photo you see the beginning of transforming the separate pieces of foam into smooth hills. This is a big challenge. I should not have started with square pieces–but I did. Lots and lots of cutting required.

I decided the upper right seemed a little plain so I added another layer on top. This time I used toothpicks to hold it in place–an idea I got from another blog. (See a pattern here? There are a lot of guides online.)
Once dry, it’s easy to clip the toothpicks off, as below. With such a small piece on the top level, it’s also a good idea to shape it before gluing it down.
For this and subsequent small pieces I used Wellbond glue (pictured above). It is similar to white glue but stronger.

After trimming, and trimming, and trimming it’s time to fill in the cracks and gaps. It is important, I think, to leave as little gap as possible. My dad once told me that paint isn’t going to hide a woodworking mistake. I think it is also true here: too big a gap will be hard to fill. Even if you can stuff enough filler into the gap, it takes forever to dry. You’ll have plenty of scraps so use them.
Here’s a shot of the rocky ledge after filling in with scraps:

There are four pieces of walnut bark in the cliff face. (Some time ago I got some 1″ walnut boards rough sawn with the edge on. By now they’re dry enough so that the edge just snaps off and they’re a perfect 1″ high.) I used a Japanese dovetail saw to trim the ends to match up. Notice the pink foam filling in the gaps. The effect is supposed to be an exposed cliff rock face emerging from the sand.

To fill in the gaps and smooth things out I used 3M wall repair Fiber Reinforced Compound, as shown. It has a creamy texture, is easy to use and dries pretty quickly. Easy to sand as well. I like the fiber which will make it harder than plaster of Paris.
Here’s a shot of the cliff face after applying the filler compound.

Finally–for this stage at any rate–an overall pic of the board after the filler and sanding. A couple of isolated rock formations have been glued down as well. The LRDG Chevy sits on the road, which is only pencil marks at this point.

Although in a lot of places the layers have been blended well, in some other places it still looks a little to “steppy” for me. It’s not too late to cut down some edges and get things to the look you want. Or to add little pieces here and there as well. Two of the cream-colored rock formations have been glued down. Nature rarely has straight lines or flat surfaces. The wind blows the sand in waves and undulating patterns. The desert often looks featureless but it’s not.
You have to make a compromise between terrain that looks realistic and terrain your figures can stand on. It’s not a model railroad layout and it’s not a pile of books under a cloth.